Menu
DIY Dressing Table
I got my inspiration from a youtuber called FacesbyStacye.. here's the video that inspired me; https://www.youtube.com/watch?v=89R-m3PbVFY
For SO long i've had such a crap dressing table and it was time I upgraded so I thought i'd show you all my new dressing table/vanity
!! Its DIY so it can give you all ideas on how to spice up your dressing table affordably and if you want to go ahead and do what i've done you'll be sure to save loads of dollllllarrrr!
First things first, I got my inspiration from FacesbyStacye who's link i've put up the top. My idea was to completely copy her and get the exact same dressing table and everything.. but when I was in IKEA on my way to the checkout with the Micke Desk in her video (£65), I saw a cute little table quite similar (minus the storage draws) for literally £14.99! I literally was not gonna spend an extra £50 on a table just because it had draws because I've made extra storage at the top anyway so I thought what the hell, and went with the cheaper version and I really love how it's turned out.
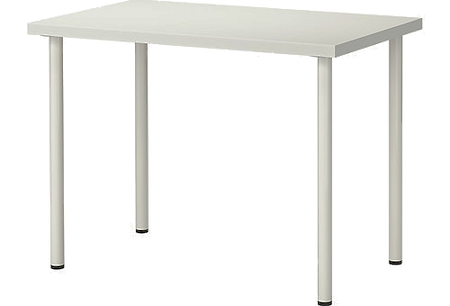
So the table that I got is called the Limmon / Adils table in white, costing a whopping £14.90- It comes all in seperate pieces so you have to buy 4 table legs and then the table top but it all comes with the price of £14.90 anyway! You have to drill the legs on yourself but it's really easy and literally took me 10 minutes then the table was up and running!

The table is actually pretty wide and spacious for the price. It's actually wider than the Micke dressing table that was £65. The downside obviously is that it has no drawers but personally i'm not bothered.. well £50 more bothered anyway!
So the next thing I decided to do was cover the top surface of the table with contact paper to make it match my room a bit more and just to give it that delicate effect! I brought contact paper from amazon, the same as the lady used in her youtube video but obviously from the UK. The contact paper was £4.82 for 2meters- it's a lovely marble contact paper that looks like the expensives surfaces that alot of nail salons etc have! The paper itself is literally like a big sticker that you have to carefully put on top- you need to be careful and push out all the air bubbles- i'd reccommend using a debit card to push out the air bubbles as you're sticking it down cm by cm (trust me I didn't use a debit card at first and ended up having to start all over again and ordering more paper!!)

Once the marble paper was on top of my table, I was happy with the look of it on it's own and nothing more needed to be done to the surface- you can always leave the sufrace the way it is when you buy it, it's a nice glossy white which I thought was nice aswell but I thought i'd rather use marble paper as my room is more grey/beige/ivory based!
THEN comes the DIY MAGIC and I definately needed help with this part as the most DIY i've done in my life time is woodworks at school lool! My uncle helped me and once again using the youtube video as a guideline we managed to make a top shelf for my dressing table. This was literally just made out of old white wood that I had around the house, and then I brought little white wood cut outs from the Ikea sale (50p why not) to divide the shelves up a little bit. You can get white cut out pieces of wood from B&Q for like £5-£10 but luckily I already had some and the bits I didn't have I managed to grab hold of whilst I was rummaging Ikea.


I mean for 50p I can't really complain! I got 4 bits of these for my shelf dividers.


It comes rolld up, 2meters worth
Okay so there's no point in giving my measurements for the table because you will all want different measurements and different heights etc. If i'm honest I couldnt give the measurements if I tried anyway because I have no idea hahah.. So basically my uncle did his man stuff and made a shelf for the top of my dressing table. I wanted the mirror to sit higher on my wall anyway, and I wanted some storage for my makeup so it was the best option. With the pieces of wood that we got hold of he was able to to easily make a shelf, if you watch the youtube video it's honestly so easy!
Then I put the contact paper on top of the shelf to make it look like it does actually come with the table and doesnt look like a random piece of wood stuck on top! It definately looks better with the contact paper on both parts of the table. I stuck the paper all down the sides of the shelf aswell as you can see.


Then my Uncle and I made a 'H' shaped divider between the top shelf so I could store more things in this little space. I definately wanted something to divide the top shelf just for more storage but that's just me personally, if you like it the way it looks without the divider then skip this step.
The divider had a brown edge to it because of the wood cutting which I definately did not like so I covered the brown with this stick on white plastic covering that my uncle had (sorry I have no link for it but try halfords!). I also covered the sides of the divider with contact paper. I was going to leave them white but I decided contact paper would tie it all together a little bit more.
So after making the 'H' shaped divider and cleaning up all the brown bits etc my dresing table was officially DONE! I hung my mirror on my wall literally about 1mm above the shelf because any higher would have been too high for me to see in when doing my makeup. I love the outcome literally so pleased with it.. here's the finished look!


These crystal pots i used to hold my makeup brushes are from Wilkinsons in the bathroom section, £3 each!

The rectangle vase is from Ikea £1.75 each
I filled it with decorative stones which are also from Ikea for £1.75


Makeup holder is from TK Max but they were on clearance sale for £9.99
Lip stick holder is from Amazon for £3.99 but you can get them on ebay too
The holder to the right is from TK Max for £4.99

These little drawers are from poundland £1, i just use them for single eyeshadows/ eyeliners as they're not very big
The mirror is £15 from Ikea